Sunday, December 5, 2010
Vintage photo of a CB550F
Here's the picture.
Wow, it makes the CB550F look like a.... Supersport!
While we're at it, here's another vintage photo, a magazine ad for the CB550F. Don't remember where I got it, somewhere from another website.
There's a slight leak at the petcock. I have a spare gas tank and petcock. I removed the petcock, cleaned it up and will swap it out with the original. We'll see if it cures the leak.
What happens is, when the bike sits, the petcock slowly leaks fuel into the carbs (yes, the petcock is in the closed position). Every once in awhile, the carb bowls overflow and dump a little gas on the ground. I hope the spare petcock doesn't leak. It's hard to find CB550F petcocks.
Saturday, November 20, 2010
What's new with my Honda
The CB550 has a junction for the brake light switch, mounted to the fork. I only needed the lower brake line. Looking online, I e-mailed a guy with a good reputation on SOHC4.net. He didn't reply to my e-mail. So I waited a few more days then started looking around in Honolulu. A company called Hydra Air Pacific, near the airport makes brake lines, among other things. They put together a new lower line for me in about half an hour and about $40 bucks. Not bad!
Next, my long time friend Felix called me up. Felix has been a motorcycle rider off and on (like me) for years. He had been watching the "Cafe Racer" TV show and was getting the itch for an old Honda four.
Old Japanese bikes are hard to find in Hawaii! Not sure why but let's think... I had seen a '77 CB550 Supersport on craigslist awhile back. The guy was asking $3,000 and it looked okay, running but not fixed up. Then there's the guy in Mililani who sold me a front wheel last year. I e-mailed him to see what happened with a CB500 he had put on craigslist. He said he still had it for sale. He had made some changes, like taking off the expensive 4 into 4 stainless exhaust and putting on a MAC pipe. But now his price went way down, to $1,800.
I called Felix and we checked it out. He was pretty excited and the Honda had some nice parts, like Works Performance shocks, rearsets and aluminum rims with stainless steel spokes. The bike still needed some finishing touches, like paint. Felix made the guy an offer, he said yes and the deal was done. Or was it? A week or two later Felix called me and said the bike was going to need too much work. I agree - Felix is married, has kids and yeah he works. Getting that bike in top shape would take a lot of time that he probably doesn't have.
Next, Felix started looking on E-bay. He found some interesting Hondas and was thinking about buying them. I told him some stories about the two RD400's I bought in the mainland, sight unseen. It really sucks to buy a bike, pay the shipping cost and find out there are problems the owner didn't tell you about. One of my RD400's didn't run when it got here and I spent hundreds at the cycle shop getting it road worthy. And the owner of that bike had told me over the phone "Yes, it runs."
At the same time Felix was hunting for a Honda, my friend Vince in Hilo was shipping a Kawasaki GPZ1100 back from the mainland. Besides the purchase price of the GPZ, Vince paid a company to haul it to a motorcycle shop, have it crated and then ship it to Hawaii. Total cost to move the bike - about $1,000. I shared that info with Felix and that backed him off a bit about buying from the mainland.
Next - I didn't really want to do this, but Felix and I started talking about his buying my CB550. I entertained the idea because I was finding that a lot of the "fun" for me was actually working on the bikes. And I have two more to work on, the KZ1000 and GS550.
Another week or two went by and then Felix bought the bike. I rode it over, then he drove me home and I gave him a box of parts, repair manual etc. Kind of sad but I knew it was going to a good home.
Felix test rides the CB550F
Three weeks later, Felix called and asked if I wanted the Honda back! Why? Well, finances were running low and as much as he liked the bike he needed some money too. He knocked the price down a bit and said "consider it a rental" for that time period. Pretty good deal. He made some changes including polishing parts using a bench grinder and removing rust using Oxalic acid.
So here we are again, the Honda has come home!
Wednesday, September 29, 2010
200 Miles and Counting
It's nice to have the starter working again with that new solenoid. The motor smokes a little, mainly noticeable when idling. The oil rings in this 555cc kit are one-piece, which supposedly is not ideal for keeping the oil out of the combustion chamber. The engine seems to have burned some oil, although it's hard to tell for sure since there were some oil leaks (crank seal) to fix when it first was running back in July. Anyways, I added half a quart to the crankcase.
The spark plugs have a tan color, looks like the jetting is okay. It's running 100 mains in cylinders 2-3 and 98's in 1-4. Needles are set at stock position (4th notch from the top) and the bike is running the stock Honda CB550F jets - not aftermarket stuff.
The Honda is pretty fun to ride! Recently I picked up a '79 KZ1000 and it has a lot more grunt. I haven't been riding the KZ much because the carbs that came with weren't properly cleaned and tuned. That will be my next project - getting the KZ going. At this point I imagine I will hang on to the 550 Supersport indefinitely. It seems to be one generation behind the KZ1000, looks a bit more antique and it's easy to handle because of the lower weight.
Sunday, September 26, 2010
CB550 Replacement Solenoid
I had checked the old solenoid by hooking it up to wires directly from the battery. It clicked and I figured it was okay. Then when everything was back together the starter wasn't working. I had wondered what could be wrong with the wiring? I had cleaned every contact in the harness and replaced the starter switch (the right switch pod) for $100 bucks.
Well the solenoid WAS shot after all. I found this out through a process of elimination and buying a low-cost replacement on E-bay for $8.99 including shipping from China!
The E-bay seller sent me a picture similar to this one when they mailed it. They said 18-22 days delivery time, however it arrived in just 10 days.
The solenoid has the proper colored wiring and connectors. The only thing that didn't match up was the rubber sleeve that holds the solenoid. The holes in the sleeve are not oriented in the correct direction to fit the space behind the CB550 side cover. Solution - I used the old rubber sleeve with the new solenoid.
Note: They did not advertise this as a CB550 solenoid, they just advertised it as a motorcycle part.
This is WAY cheaper than what other vendors charge for a solenoid for a CB550. If you're in need of a solenoid try the seller on E-bay: http://myworld.ebay.com/ilovegoods6699
Tuesday, August 31, 2010
Ready to ride
- The starter and the headlight weren't working. Both of those are connected via the handlebar switch. I took the switch apart, cleaned it up and put it back together. Still no go. Splurged and bought a new switch (costs about $100). That fixed the headlight problem but still the starter wasn't working.
- The left side crank seal was leaking! Why did this happen? It didn't leak before the engine came apart! I am guessing that the time the crank was out of the engine (about six months) caused it to leak. The seal was leaking right where it contacts the crank. If it were leaking around the crankcase joint it might have been possible to seal it up with permatex or something.
Monday, July 12, 2010
CB550 Ups and Downs
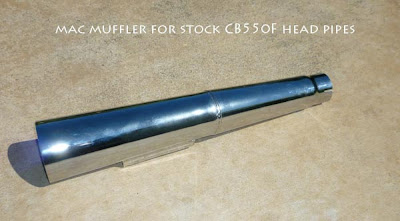

The muffler was really easy to install - three bolts. The clamp at the headpipe junction, the bolt at the muffler and the connecting strap that goes to the passenger footpegs. That's it.
The more I look at the Honda the more I like it. There have been a lot of problems, in the end I think it will be worth it. I'm hoping to get the new carb boots and a few other pieces within a couple of weeks so I can actually ride this baby on the open road!
Friday, July 2, 2010
My CB550 started today!
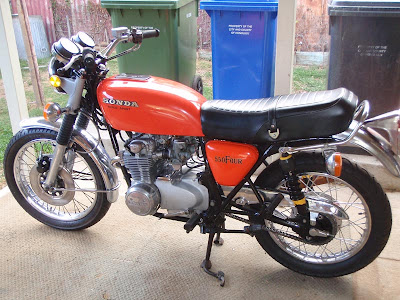 It's been months and the victory arrived today! I've been working on the Honda in my spare time for the last couple of days trying to get some details sorted out. When I reinstalled the wiring harness, the only thing that would work was the tail light. A member of the SOHC4.NET forum suggested I check the wiring right at the point where the ignition plugs into the harness. I disconnected the wiring and hotwired it. The lights came on. Thus I knew the ignition wasn't getting a good connection. I cleaned the terminals and carefully plugged them back in. Then I checked to see if the ignition worked before I bolted it back to the triple clamp. The lights worked and I put it all back together.
Secure the wiring harness to the frame; 3) Put the airbox back on; 4) Put a new muffler on.
Tuesday, June 22, 2010
Let's take the motor apart again

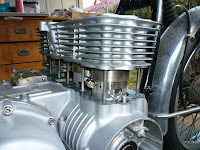
 The first picture shows the second piston ring. The mark on it says "STD 3". The second picture shows the top and the oil ring. Click on the photos for larger pics and you can see the marks better. That's the mark indicating "this side up" when installing them on the piston.
Why a 3? Probably because this is a 3mm overbore kit for CB500 motors. I'm using it on a CB550, making it a 1/2mm overbore.
I spent a Sunday late morning and all afternoon, taking the motor apart down to the pistons, checking the rings, reinstalling and putting the motor back together. Good think I did this now, because about half of the top rings and oil rings were upside down as odds would predict.
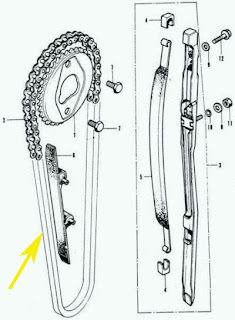
I had some problems getting the cam chain on once again. At least this time I figured out how to slacken up the chain tensioner to get that sprocket and chain in place on the cam. Turn the little screw on the tensioner to the left to get the most slack. Don't try forcing the sprocket onto the cam if there's not enough slack, you might end up stripping the threads on the bolt!
So the motor is back together and we're getting close to startup day.
Saturday, June 12, 2010
Changing a tire
Wednesday, June 9, 2010
Putting the motor back together
Another Important Lesson with CB550 Motors
Wednesday, May 26, 2010
Important info when working on a CB550 motor
Here are some observations.
When I split the cases a couple of months ago I put the transmission parts in a bag. Last week when I started putting the motor back together, the bearing race seen in the photo fell off and out fell some tiny needle bearings! Usually needle bearings are "caged," that is they are held together in a race. This set of bearings has a race but they are not attached. After sitting around for months the oil keeping them in place drained out and the bearings scattered. Most of them were easy to find but I had to hunt around the carport to find the last two on the floor. There are a total of 16 needle bearings. I packed them with automotive grease to keep them together when I put the race back on the transmission main shaft.


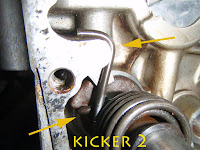
Another item to keep an eye on is the kickstart shaft. It's easy to take motors apart and harder to remember how they go back together. I installed the two transmission shafts and saw that the countershaft was engaging the kickstart shaft. Then I was trying to remember how these two shafts should work together. When I turned the countershaft it would wind up the kickstart shaft. That's okay for starting the engine with the kickstarter but we don't want the two gears to mesh all the time.


