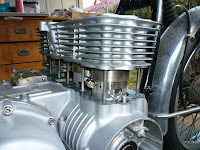
Tuesday, June 22, 2010

Let's take the motor apart again

I read some posts on SOHC4.NET from others who had purchased the same piston kit as I. They had problems with excessive oil consumption BIG TIME!

The problem stems from installing the oil rings upside down. They push the oil up towards the combustion chamber instead of down towards the crankcase.

I had no idea whether my rings were right side up or not. All I did was install the rings in the correct order. The marks on the rings to indicate "up" or "down" are very small. Old eyes like mine need a magnifying glass to read them.

Further reading indicated that all of the rings have an "up" side. The "up" side of the top piston ring, like the oil ring, can only be identified by the mark. The second ring is kind of easy because it has a ridge along the bottom - intuition says to put the ridge on the bottom.

Here are the rings:
CB550 piston ring
555cc piston ringsThe first picture shows the second piston ring. The mark on it says "STD 3". The second picture shows the top and the oil ring. Click on the photos for larger pics and you can see the marks better. That's the mark indicating "this side up" when installing them on the piston.

Why a 3? Probably because this is a 3mm overbore kit for CB500 motors. I'm using it on a CB550, making it a 1/2mm overbore.

I spent a Sunday late morning and all afternoon, taking the motor apart down to the pistons, checking the rings, reinstalling and putting the motor back together. Good think I did this now, because about half of the top rings and oil rings were upside down as odds would predict.

I had some problems getting the cam chain on once again. At least this time I figured out how to slacken up the chain tensioner to get that sprocket and chain in place on the cam. Turn the little screw on the tensioner to the left to get the most slack. Don't try forcing the sprocket onto the cam if there's not enough slack, you might end up stripping the threads on the bolt!

So the motor is back together and we're getting close to startup day.

Saturday, June 12, 2010

Changing a tire

The tires on this Honda are old - maybe 10 years, I am not sure. I've owned the bike for nearly three years now and the guy who sold it to me had the Avons on it for at least a few years.

I have a new(er) front rim and tire from a guy who had some extra parts in Mililani. I'll run that tire for awhile.

Picked up a new rear tire from Glenn's Cycle Supply in Kaimuki - a Kenda, with a tube cost about $80 bucks. The tire size is 110/90 x 18. I went with the less expensive tire (Contis etc. run over $100 per tire) because I don't plan on doing much peg scraping, just cruising.

Well I thought I'd give it a shot at changing the tire on my own. The old one was brittle and tough to get off. I had two tire levers and could just barely get the bead over one part of the rim. Bust out the sawzall, cut the tire. I didn't cut down to the bead because I was afraid about messing up the rim with the saw blade. So I levered the bead away from the rim and cut it with a bolt cutter. Both sides.

Removing the tire took awhile, probably 20-30 minutes. Putting on the new one was surprisingly easy. I sprayed soapy water on the rim, used the levers and got one bead on within a minute. Stuck the tube in, put the valve stem in place then sprayed some more soapy water on the remaining bead. It levered pretty easy until the last couple of inches. I stood on the tire to get the bead in and then used one tire lever to get the last section in place. That took all of five minutes - if that. Yeah!

Next I pumped it up and was happy to see I didn't puncture the tube with the tire lever - it was fine.

The tread pattern on the Kenda looks kind of tractor-ish. If I could do it again I might choose another tire even if it cost a bit more. I had ordered a Cheng Shin, but when I went to the shop Glenn told me that size of Cheng Shin went out of production so the distributor sent the Kenda.

That's okay, main thing there's a good tire on the bike with no cracks in the sidewall.

Wednesday, June 9, 2010

Putting the motor back together

Hey it looks like I'll get this motor back together this year! A set of pistons from e-bay should get the bike running nicely again. They are 3mm overbore for a CB500 = .5mm overbore for a CB550. I believe that brings the displacement to 555cc. More importantly, the cylinders will be cleaned up and aligned properly. I read in the FAQ section of SOHC4.net that the cylinders get slightly out of alignment as mileage adds up. Reboring them straightens things out and restores power. I hope that's true!

I used a set of hose clamps to compress the rings on cylinders 2 and 3. Once those were in, I moved the hose clamps to cylinders 1 and 4. I did this very slowly to make sure not to break a ring. It would be hard to find replacements.

honda 555cc big bore kit labelputting the cylinders back on the CB550


Another Important Lesson with CB550 Motors

I was pretty excited getting at making progress on the motor. Then I got to the cam installation. On CB550's this is a tough thing to do. Gotta slide the cam in thru the chain, put it in place and then slide the sprocket in "just right". The issue is having enough slack in the cam chain to get the sprocket mounted.

I read about it, followed the procedures described online and I couldn't get it! Kept looking online and then I realized what was wrong: The cam chain was on the wrong side of the front tensioner!

Okay I have taken apart two other inline four motors. My CB400F, 30 years ago and and my Suzuki GS750 back in the mid 1980's. With both of those motors, the cam chain is pushed inwards by the cam chain tensioner at the front of the motor. On the CB500 and CB550, the cam chain goes AROUND the front cam chain tensioner guide. See the diagram below.
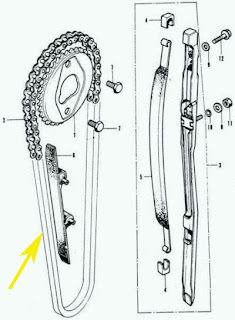
CB550 cam chain tensioner

Now I had to pull the cylinders off after having so carefully fit the pistons in them! And that's what I did. With the cylinders off I could remove the front tensioner, turn it round and reinstall it with the cam chain in front. With that done, the cylinders went back on (easier the second time), then the head and I was back to installing the cam.

It was still tough to install the chain and sprocket on the cam, using up every little bit of slack in the cam chain and with the tensioner tightened as much as I dared. Eventually I got the chain on the sprocket and the sprocket bolted to the cam.

If you've never done this before, note that the camshaft must be TIMED to the crankshaft. Read the shop manual to learn how to do it. If that's not done correctly, the engine might not run OR the pistons might hit the valves and you're screwed. If you're off just a little, like one tooth from where the cam is supposed to be, the engine will run but it won't be nice.

The motor is pretty much back together now. Last night I worked on the wiring harness, cleaning up connections and crimping some wires. I'll put it back on the bike, then reinstall the carbs and airbox. We're getting there.