Hey it looks like I'll get this motor back together this year! A set of pistons from e-bay should get the bike running nicely again. They are 3mm overbore for a CB500 = .5mm overbore for a CB550. I believe that brings the displacement to 555cc. More importantly, the cylinders will be cleaned up and aligned properly. I read in the FAQ section of SOHC4.net that the cylinders get slightly out of alignment as mileage adds up. Reboring them straightens things out and restores power. I hope that's true!
I used a set of hose clamps to compress the rings on cylinders 2 and 3. Once those were in, I moved the hose clamps to cylinders 1 and 4. I did this very slowly to make sure not to break a ring. It would be hard to find replacements.
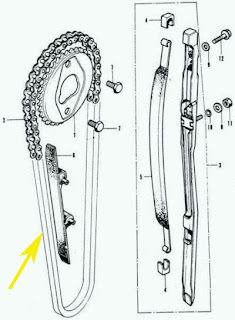
Another Important Lesson with CB550 Motors
I was pretty excited getting at making progress on the motor. Then I got to the cam installation. On CB550's this is a tough thing to do. Gotta slide the cam in thru the chain, put it in place and then slide the sprocket in "just right". The issue is having enough slack in the cam chain to get the sprocket mounted.
I read about it, followed the procedures described online and I couldn't get it! Kept looking online and then I realized what was wrong: The cam chain was on the wrong side of the front tensioner!
Okay I have taken apart two other inline four motors. My CB400F, 30 years ago and and my Suzuki GS750 back in the mid 1980's. With both of those motors, the cam chain is pushed inwards by the cam chain tensioner at the front of the motor. On the CB500 and CB550, the cam chain goes AROUND the front cam chain tensioner guide. See the diagram below.
Now I had to pull the cylinders off after having so carefully fit the pistons in them! And that's what I did. With the cylinders off I could remove the front tensioner, turn it round and reinstall it with the cam chain in front. With that done, the cylinders went back on (easier the second time), then the head and I was back to installing the cam.
It was still tough to install the chain and sprocket on the cam, using up every little bit of slack in the cam chain and with the tensioner tightened as much as I dared. Eventually I got the chain on the sprocket and the sprocket bolted to the cam.
If you've never done this before, note that the camshaft must be TIMED to the crankshaft. Read the shop manual to learn how to do it. If that's not done correctly, the engine might not run OR the pistons might hit the valves and you're screwed. If you're off just a little, like one tooth from where the cam is supposed to be, the engine will run but it won't be nice.
The motor is pretty much back together now. Last night I worked on the wiring harness, cleaning up connections and crimping some wires. I'll put it back on the bike, then reinstall the carbs and airbox. We're getting there.


