 I've highlighted the funny part to make sure you'll find it.
Tuesday, March 3, 2015
CB550 shop manual - what's wrong here?
If you have stumbled on this blog you will have noted that I haven't posted in years. I sold the CB550F, the new owner stays in touch with me. Tonight I was looking at the shop manual to help him with some repairs and I saw something funny.
 I've highlighted the funny part to make sure you'll find it.
I've highlighted the funny part to make sure you'll find it.


Monday, October 3, 2011
LED lights for the CB550

Not long ago, guys were figuring out complicated ways to get led lights working in their gauges and pilot boxes. The hardest part was adapting a bulb to fit the wiring harness.
This is no longer difficult. Now you can just buy a replacement light bulb that fits right in the socket. The bulb is called a BA9s. They come in different colors. You can get white, red, blue, green etc. White works great for the speedo and tach. White also works for the bulbs in the pilot box, but you can get red for the oil light, blue for the high beam and green for the neutral light if you want.
LED's use less power than regular bulbs and are sometimes (not always) brighter. I would say that's the main thing, the bulbs are usually bright enough but once in awhile they are not as bright as one might expect.
Replacement bulbs for tail lights are easy too. Just get an 1157. It should pop right in and work. Being that this is a light that other drivers see, it's important to get a very bright one. I like 1157's that have at least 45 LED's on them. The more, the better. Of course the more LED's the more expensive the light is.
An easy source for finding LED's is E-bay. There have been a few bulbs I bought from E-bay vendors that were not very bright and one of them failed within days. And once I bought an 1157 LED that would not fit into the socket. I think it might work for a car's tail light but the shape of the base would not fit into the socket on any of my motorcycles.
One thing I have not tackled is putting LED's in turn signals. Reading the SOHC forums, many have had problems with getting the turn signals to blink because of the light load. Regular flashers won't work because the LED's don't work correctly with the relays in the flashers. So people installing the LED turn signal lights have to change the relays too or figure out other things to do. And then there's the brightness factor too.
I'll wait on LED lights for my turn signals until it gets a bit easier to do.
Sunday, June 26, 2011
Clubmans on the Supersport
I sold the Honda recently. The new owner is a younger guy and he wanted some help fixing the Honda up how he wants it. So it's still at my house even though it's sold. He wants clubman handlebars.
Today I got to work on it. The first task was to grind a wire passage in the left control switches. Reason: the stock handlebars have holes where the wiring goes through them from switches to the center of the bar. The clubman bars are not drilled for internal wiring.
I had a spare left control switch so I worked on it and left the switch on the stock handlebar intact. It took quite awhile for me to grind a smooth gap big enough for the wires to go through. It's important not to grind into the wiring in the switches. The right switches were newer, I replaced them about a year ago and they actually had a gap built in for external wiring. This was not a feature on the original switches.
Next, removing the stock handlebars, disconnecting the throttle cables and the cafe mirrors. I bolted on the clubmans and got to work installing the switches on both sides along with the front brake master cylinder. The shorter bars resulted in excess throttle cable and hydraulic brake line, which had to be routed out so that the controls would work properly without binding. Another concern was making sure the switches on the handlebars would not bang on the gas tank at full lock.
With the bars on and the controls hooked up, next came the wiring. Here's where I ran into a snag. The left switches were from a different model CB, maybe a CB500 or CB550k. There are 11 wires coming from the switches and I think nine of them matched the wiring harness. The other two wires had similar colors but you only need to have one wire in the wrong socket to screw things up. At first, the headlight wasn't working. I moved the wires around a bit and then the headlight worked. But when I checked the turn signals, flipping the right signal would also cause the left signal AND the tail light to blink. And the same problem when flipping the left turn signal switch.
This is where I slowed down, counted the wires and identified the "suspect" wires where I wasn't sure if they were matching up correctly. A few more plugs and unplugs and it was figured out. Then I took some colored electrician's tape and color coded the wires for the next guy.
Here's how the bike looks with clubmans:

 What do you think, is this a good look? Back in the day I would have liked it. Now, I think a set of CB400F bars (drilled for internal wiring) or a set of superbike bars would look better. And feel better.
The Honda has a new owner, so we'll let him have it his way.
Today I got to work on it. The first task was to grind a wire passage in the left control switches. Reason: the stock handlebars have holes where the wiring goes through them from switches to the center of the bar. The clubman bars are not drilled for internal wiring.
I had a spare left control switch so I worked on it and left the switch on the stock handlebar intact. It took quite awhile for me to grind a smooth gap big enough for the wires to go through. It's important not to grind into the wiring in the switches. The right switches were newer, I replaced them about a year ago and they actually had a gap built in for external wiring. This was not a feature on the original switches.
Next, removing the stock handlebars, disconnecting the throttle cables and the cafe mirrors. I bolted on the clubmans and got to work installing the switches on both sides along with the front brake master cylinder. The shorter bars resulted in excess throttle cable and hydraulic brake line, which had to be routed out so that the controls would work properly without binding. Another concern was making sure the switches on the handlebars would not bang on the gas tank at full lock.
With the bars on and the controls hooked up, next came the wiring. Here's where I ran into a snag. The left switches were from a different model CB, maybe a CB500 or CB550k. There are 11 wires coming from the switches and I think nine of them matched the wiring harness. The other two wires had similar colors but you only need to have one wire in the wrong socket to screw things up. At first, the headlight wasn't working. I moved the wires around a bit and then the headlight worked. But when I checked the turn signals, flipping the right signal would also cause the left signal AND the tail light to blink. And the same problem when flipping the left turn signal switch.
This is where I slowed down, counted the wires and identified the "suspect" wires where I wasn't sure if they were matching up correctly. A few more plugs and unplugs and it was figured out. Then I took some colored electrician's tape and color coded the wires for the next guy.
Here's how the bike looks with clubmans:


The Honda has a new owner, so we'll let him have it his way.
CB550F wiring diagram
It's easy to find a wiring diagram for a CB500 or CB550. Not so easy to find a wiring diagram for a CB550F also known as the Supersport.
This diagrams is black and white. Well at least its for an "F" model.

This diagrams is black and white. Well at least its for an "F" model.

Thursday, February 24, 2011
Fixing that elusive Honda CB brake squeal - really!

I've been riding my CB550F around the island and enjoying it, EXCEPT when using the brakes. That squeal is annoying, even with ear plugs on. The sound can be modulated by varying brake lever pressure. But let's face it, when we're using the brakes we just want to concentrate on stopping and not noise levels.
So I had been doing this and that upgrading the brakes and hoping to get rid of that noise. Some of the upgrades included a new brake piston (Kevin 400F's from the sohc4 forum) made out of a hard plastic that will not corrode, Ferodo brake pads from the old days with asbestos braking material along with the master cylinder and new braided lower line mentioned in earlier posts.
The brake's stopping performance has been great! Just that sound...
So here's what I recently did attempting to fix the problem:
- Read through numerous posts on the Sohc4.net forum about brake squeal.
- Bought some high temp grease, cleaned the outboard brake pad off and coated its metal surfaces (not the brake pad material) then reinstalled it.
- Put "disc brake quiet" on the back of the inboard brake pad.
- Rode around with a loud brake squeal, except for just a few times here and there when it went away.
- Removed the arm that holds the disc brake pad assembly.
- Lubricated the pivot pin and o-rings with the high temp grease.
- Reassembled and lubricated the adjustment screw that aligns the brake pads to the disc.
- Cleaned off the brake pad that I had already lubricated with high temp grease and then lubricated it with that same grease AGAIN (on the metal surfaces and not the pad material).
- Used 150 grit sandpaper and scratched up the surfaces of the brake pads. Also gently chamfered the pads on the side where the disc contacts them first (the side closer to the motor).
- Lightly sanded the outboard side of the disc brake with the 150 grit sandpaper.
I believe the high temp grease layer between the caliper piston and the pad kept the noise away (for awhile). That is, until some of the layer squeezed out from between the piston and the pad. So I took the caliper apart again, put disc brake quiet on the back of this (brake piston-side) pad, let it dry thoroughly and placed it back in the caliper. The idea was letting the disc brake quiet dry thoroughly before reinstalling would help it set up on the back of the pad so it wouldn't squeeze out. It took another week until I had time to ride the Honda and I'm happy to report no more brake squeal.
Sunday, December 5, 2010
Vintage photo of a CB550F
I saw the August 1975 issue of Cycle World for sale on E-bay today. The starting bid is $14.50 plus $2.50 shipping equals $17. I just want the cover photo, so I copied and edited it with Photoshop.
Here's the picture.

Wow, it makes the CB550F look like a.... Supersport!
While we're at it, here's another vintage photo, a magazine ad for the CB550F. Don't remember where I got it, somewhere from another website.

There's a slight leak at the petcock. I have a spare gas tank and petcock. I removed the petcock, cleaned it up and will swap it out with the original. We'll see if it cures the leak.
What happens is, when the bike sits, the petcock slowly leaks fuel into the carbs (yes, the petcock is in the closed position). Every once in awhile, the carb bowls overflow and dump a little gas on the ground. I hope the spare petcock doesn't leak. It's hard to find CB550F petcocks.
Here's the picture.

Wow, it makes the CB550F look like a.... Supersport!
While we're at it, here's another vintage photo, a magazine ad for the CB550F. Don't remember where I got it, somewhere from another website.

There's a slight leak at the petcock. I have a spare gas tank and petcock. I removed the petcock, cleaned it up and will swap it out with the original. We'll see if it cures the leak.
What happens is, when the bike sits, the petcock slowly leaks fuel into the carbs (yes, the petcock is in the closed position). Every once in awhile, the carb bowls overflow and dump a little gas on the ground. I hope the spare petcock doesn't leak. It's hard to find CB550F petcocks.
Saturday, November 20, 2010
What's new with my Honda
After a few rides the Honda's front brake line failed. It was a braided line installed years ago by the previous owner. I was getting ready for a ride, grabbed the brake and fluid sprayed all over the place. There was a small fray near the front wheel and the line had punctured.
The CB550 has a junction for the brake light switch, mounted to the fork. I only needed the lower brake line. Looking online, I e-mailed a guy with a good reputation on SOHC4.net. He didn't reply to my e-mail. So I waited a few more days then started looking around in Honolulu. A company called Hydra Air Pacific, near the airport makes brake lines, among other things. They put together a new lower line for me in about half an hour and about $40 bucks. Not bad!
Next, my long time friend Felix called me up. Felix has been a motorcycle rider off and on (like me) for years. He had been watching the "Cafe Racer" TV show and was getting the itch for an old Honda four.
Old Japanese bikes are hard to find in Hawaii! Not sure why but let's think... I had seen a '77 CB550 Supersport on craigslist awhile back. The guy was asking $3,000 and it looked okay, running but not fixed up. Then there's the guy in Mililani who sold me a front wheel last year. I e-mailed him to see what happened with a CB500 he had put on craigslist. He said he still had it for sale. He had made some changes, like taking off the expensive 4 into 4 stainless exhaust and putting on a MAC pipe. But now his price went way down, to $1,800.
I called Felix and we checked it out. He was pretty excited and the Honda had some nice parts, like Works Performance shocks, rearsets and aluminum rims with stainless steel spokes. The bike still needed some finishing touches, like paint. Felix made the guy an offer, he said yes and the deal was done. Or was it? A week or two later Felix called me and said the bike was going to need too much work. I agree - Felix is married, has kids and yeah he works. Getting that bike in top shape would take a lot of time that he probably doesn't have.
Next, Felix started looking on E-bay. He found some interesting Hondas and was thinking about buying them. I told him some stories about the two RD400's I bought in the mainland, sight unseen. It really sucks to buy a bike, pay the shipping cost and find out there are problems the owner didn't tell you about. One of my RD400's didn't run when it got here and I spent hundreds at the cycle shop getting it road worthy. And the owner of that bike had told me over the phone "Yes, it runs."
At the same time Felix was hunting for a Honda, my friend Vince in Hilo was shipping a Kawasaki GPZ1100 back from the mainland. Besides the purchase price of the GPZ, Vince paid a company to haul it to a motorcycle shop, have it crated and then ship it to Hawaii. Total cost to move the bike - about $1,000. I shared that info with Felix and that backed him off a bit about buying from the mainland.
Next - I didn't really want to do this, but Felix and I started talking about his buying my CB550. I entertained the idea because I was finding that a lot of the "fun" for me was actually working on the bikes. And I have two more to work on, the KZ1000 and GS550.
Another week or two went by and then Felix bought the bike. I rode it over, then he drove me home and I gave him a box of parts, repair manual etc. Kind of sad but I knew it was going to a good home.

Three weeks later, Felix called and asked if I wanted the Honda back! Why? Well, finances were running low and as much as he liked the bike he needed some money too. He knocked the price down a bit and said "consider it a rental" for that time period. Pretty good deal. He made some changes including polishing parts using a bench grinder and removing rust using Oxalic acid.
So here we are again, the Honda has come home!
The CB550 has a junction for the brake light switch, mounted to the fork. I only needed the lower brake line. Looking online, I e-mailed a guy with a good reputation on SOHC4.net. He didn't reply to my e-mail. So I waited a few more days then started looking around in Honolulu. A company called Hydra Air Pacific, near the airport makes brake lines, among other things. They put together a new lower line for me in about half an hour and about $40 bucks. Not bad!
Next, my long time friend Felix called me up. Felix has been a motorcycle rider off and on (like me) for years. He had been watching the "Cafe Racer" TV show and was getting the itch for an old Honda four.
Old Japanese bikes are hard to find in Hawaii! Not sure why but let's think... I had seen a '77 CB550 Supersport on craigslist awhile back. The guy was asking $3,000 and it looked okay, running but not fixed up. Then there's the guy in Mililani who sold me a front wheel last year. I e-mailed him to see what happened with a CB500 he had put on craigslist. He said he still had it for sale. He had made some changes, like taking off the expensive 4 into 4 stainless exhaust and putting on a MAC pipe. But now his price went way down, to $1,800.
I called Felix and we checked it out. He was pretty excited and the Honda had some nice parts, like Works Performance shocks, rearsets and aluminum rims with stainless steel spokes. The bike still needed some finishing touches, like paint. Felix made the guy an offer, he said yes and the deal was done. Or was it? A week or two later Felix called me and said the bike was going to need too much work. I agree - Felix is married, has kids and yeah he works. Getting that bike in top shape would take a lot of time that he probably doesn't have.
Next, Felix started looking on E-bay. He found some interesting Hondas and was thinking about buying them. I told him some stories about the two RD400's I bought in the mainland, sight unseen. It really sucks to buy a bike, pay the shipping cost and find out there are problems the owner didn't tell you about. One of my RD400's didn't run when it got here and I spent hundreds at the cycle shop getting it road worthy. And the owner of that bike had told me over the phone "Yes, it runs."
At the same time Felix was hunting for a Honda, my friend Vince in Hilo was shipping a Kawasaki GPZ1100 back from the mainland. Besides the purchase price of the GPZ, Vince paid a company to haul it to a motorcycle shop, have it crated and then ship it to Hawaii. Total cost to move the bike - about $1,000. I shared that info with Felix and that backed him off a bit about buying from the mainland.
Next - I didn't really want to do this, but Felix and I started talking about his buying my CB550. I entertained the idea because I was finding that a lot of the "fun" for me was actually working on the bikes. And I have two more to work on, the KZ1000 and GS550.
Another week or two went by and then Felix bought the bike. I rode it over, then he drove me home and I gave him a box of parts, repair manual etc. Kind of sad but I knew it was going to a good home.

Felix test rides the CB550F
Three weeks later, Felix called and asked if I wanted the Honda back! Why? Well, finances were running low and as much as he liked the bike he needed some money too. He knocked the price down a bit and said "consider it a rental" for that time period. Pretty good deal. He made some changes including polishing parts using a bench grinder and removing rust using Oxalic acid.
So here we are again, the Honda has come home!
Wednesday, September 29, 2010
200 Miles and Counting

It's nice to have the starter working again with that new solenoid. The motor smokes a little, mainly noticeable when idling. The oil rings in this 555cc kit are one-piece, which supposedly is not ideal for keeping the oil out of the combustion chamber. The engine seems to have burned some oil, although it's hard to tell for sure since there were some oil leaks (crank seal) to fix when it first was running back in July. Anyways, I added half a quart to the crankcase.
The spark plugs have a tan color, looks like the jetting is okay. It's running 100 mains in cylinders 2-3 and 98's in 1-4. Needles are set at stock position (4th notch from the top) and the bike is running the stock Honda CB550F jets - not aftermarket stuff.
The Honda is pretty fun to ride! Recently I picked up a '79 KZ1000 and it has a lot more grunt. I haven't been riding the KZ much because the carbs that came with weren't properly cleaned and tuned. That will be my next project - getting the KZ going. At this point I imagine I will hang on to the 550 Supersport indefinitely. It seems to be one generation behind the KZ1000, looks a bit more antique and it's easy to handle because of the lower weight.
Sunday, September 26, 2010
CB550 Replacement Solenoid
Starter Problem Fixed
I had checked the old solenoid by hooking it up to wires directly from the battery. It clicked and I figured it was okay. Then when everything was back together the starter wasn't working. I had wondered what could be wrong with the wiring? I had cleaned every contact in the harness and replaced the starter switch (the right switch pod) for $100 bucks.
Well the solenoid WAS shot after all. I found this out through a process of elimination and buying a low-cost replacement on E-bay for $8.99 including shipping from China!

The E-bay seller sent me a picture similar to this one when they mailed it. They said 18-22 days delivery time, however it arrived in just 10 days.
The solenoid has the proper colored wiring and connectors. The only thing that didn't match up was the rubber sleeve that holds the solenoid. The holes in the sleeve are not oriented in the correct direction to fit the space behind the CB550 side cover. Solution - I used the old rubber sleeve with the new solenoid.
Note: They did not advertise this as a CB550 solenoid, they just advertised it as a motorcycle part.
This is WAY cheaper than what other vendors charge for a solenoid for a CB550. If you're in need of a solenoid try the seller on E-bay: http://myworld.ebay.com/ilovegoods6699
I had checked the old solenoid by hooking it up to wires directly from the battery. It clicked and I figured it was okay. Then when everything was back together the starter wasn't working. I had wondered what could be wrong with the wiring? I had cleaned every contact in the harness and replaced the starter switch (the right switch pod) for $100 bucks.
Well the solenoid WAS shot after all. I found this out through a process of elimination and buying a low-cost replacement on E-bay for $8.99 including shipping from China!

The E-bay seller sent me a picture similar to this one when they mailed it. They said 18-22 days delivery time, however it arrived in just 10 days.
The solenoid has the proper colored wiring and connectors. The only thing that didn't match up was the rubber sleeve that holds the solenoid. The holes in the sleeve are not oriented in the correct direction to fit the space behind the CB550 side cover. Solution - I used the old rubber sleeve with the new solenoid.
Note: They did not advertise this as a CB550 solenoid, they just advertised it as a motorcycle part.
This is WAY cheaper than what other vendors charge for a solenoid for a CB550. If you're in need of a solenoid try the seller on E-bay: http://myworld.ebay.com/ilovegoods6699
Tuesday, August 31, 2010
Ready to ride
There were a few things to sort out after the engine started up in July.
- The starter and the headlight weren't working. Both of those are connected via the handlebar switch. I took the switch apart, cleaned it up and put it back together. Still no go. Splurged and bought a new switch (costs about $100). That fixed the headlight problem but still the starter wasn't working.
- The left side crank seal was leaking! Why did this happen? It didn't leak before the engine came apart! I am guessing that the time the crank was out of the engine (about six months) caused it to leak. The seal was leaking right where it contacts the crank. If it were leaking around the crankcase joint it might have been possible to seal it up with permatex or something.
Changing the crank seal usually involves splitting the crankcases. Yeah I could do it in maybe an 8 hour day (with all the practice I had working on the motor this year) but I would rather not.
Looking at the SOHC4.net forum, some members described removing the seal and installing a new one with the motor intact. Yesterday I gave it a try.
By the way, I did not change the seals when I initially split the engine because I've never seen one leak and I didn't have a stator puller. Finding a stator puller turned out to be pretty easy, just finding the right size bolt at a hardware store (16mm x 1.5 pitch). It cost about $6 bucks.
After removing the stator I pried the old seal out (be careful not to scratch the crankshaft). I hear there are special tools for pulling seals, next time I'll buy one. Then I used a rubber mallet and a piece of wood to slowly and evenly push the new seal into place. Oh, by the way the seal has a little ridge on it. I trimmed it off with a sharp knife as it seemed the seal would never go in with the ridge intact.
Yesterday I rode the bike a few miles and it looks like the leak is gone! It is certainly better than it was before the fix. The first time I started and rode the Honda I came home and had oil on my left shoe.
Of course another problem suddenly popped up. The headlight, which had worked when I installed the new handlebar switch, suddenly stopped working on the low beam. Funny, as I was riding the low beam started working again and then when I got home it stopped. I wondered if it was the juice in the battery, but the high beam worked consistently.
I had a spare halogen headlight in storage. Pulled it out, hooked it up and both the low and high beam worked. So the problem was the 34 year old headlight, which went into the trash and was replaced with a halogen unit. I hope the charging system can support this 55w low / 60w high beam bulb.
Okay, that leaves the starter to fix. Last month I checked the solenoid and it worked. The starter itself works, I can arc the two leads on top of the solenoid and turn the motor over. And the handlebar switch is new. So what's the problem? I'm not sure but we have all those other things tackled, I'll get the starter going by tracing the wiring or if worse comes to worse running new wires along the harness.
One more thing to remember. When I rode the CB550F yesterday the idle was a little rough and there was some backfiring on trailing throttle. I adjusted the mixture screws on the sides of the carbs and set them to 1 1/4 turns out (about 1/2 turn in from the previous settings) which richens up the mixture a bit. The bike immediately idled better. I'll take it out for another road test when the rain stops.
Monday, July 12, 2010
CB550 Ups and Downs
I was pretty excited when the Honda started up on July 2nd. In the days afterwards, it didn't run as well. In fact it barely ran at all. I thought about why it would run decently and then quickly turn sour. Looking at info on the internet, I decided it's probably intake leaks from the 34 year-old carb boots.
There are some methods for restoring the boots, but the boots seem to be available from Honda so why not just order a set and avoid the playing around?
Meanwhile, I had three sets of stock CB550F needles and emulsion tubes, purchased on E-bay. I installed them on carbs 1-3. Then I ordered a set from Honda for carb #4. Not sure they can still be found, we'll give it a try though.
It's a good thing I took the carbs apart. The needle clips were on different settings - one carb had the clip set at #2 from the highest notch, the other three had the clips set at #2 from the lowest notch (stock).
The main jets on carbs 1 and 4 were 98's (stock). The mains on carbs 2-3 were 110's - probably too rich for a stock motor. I ordered a set of 100's off E-bay to replace them. That's slightly richer than stock, the inside cylinders tend to get hotter though and it might be good insurance to go that tiny bit richer.
A new MAC muffler for the stock CB550F four into one arrived in the mail today. Cost about $185, including the baffle. I think it looks great! Probably better than the stocker, which looks like a cigar.


The muffler was really easy to install - three bolts. The clamp at the headpipe junction, the bolt at the muffler and the connecting strap that goes to the passenger footpegs. That's it.
The more I look at the Honda the more I like it. There have been a lot of problems, in the end I think it will be worth it. I'm hoping to get the new carb boots and a few other pieces within a couple of weeks so I can actually ride this baby on the open road!
Friday, July 2, 2010
My CB550 started today!
 It's been months and the victory arrived today! I've been working on the Honda in my spare time for the last couple of days trying to get some details sorted out. When I reinstalled the wiring harness, the only thing that would work was the tail light. A member of the SOHC4.NET forum suggested I check the wiring right at the point where the ignition plugs into the harness. I disconnected the wiring and hotwired it. The lights came on. Thus I knew the ignition wasn't getting a good connection. I cleaned the terminals and carefully plugged them back in. Then I checked to see if the ignition worked before I bolted it back to the triple clamp. The lights worked and I put it all back together.
Next issue - the starter wouldn't turn over. Back to the SOHC.NET forum and I learned about running a screwdriver across the two terminals on the solenoid. I tried it and it worked. So I could get the starter to work and it narrowed the problem down to the wiring that goes to the starter button on the right side cluster of buttons.
Last night I put some gas in the carbs and tried starting. No luck. I let it sit and this afternoon after work I put the tank on and added gas. I figured maybe the carbs weren't getting enough gas in them last night.
The motor turned over and there were a few backfires. No startup. Next I removed the ignition cover, pulled the #4 spark plug and turned the crank with a wrench. I looked and listened for a spark. I noticed that the spark was coming when the crank was at the 2-3 firing position instead of 1-4. I pulled the tank, looked at the wiring and it was correct. The blue wire at the harness plugged into the 1-4 coil and the yellow harness wire plugged into the yellow wire for the 2-3 coil. Well, I know what I saw (when the spark appeared) so I switched the yellow and blue leads. Try the starter again and the motor fired up!
That was great, now why did it start when the wires didn't match up. The answer was at the other end of the wires. The person who installed the Dyna ignition put the wrong color codes on them. The Dyna has a black wire and a white wire. The installer put some plastic on those wires (blue and yellow) but in reverse. When I put the bike back together, I wired it as indicated, which didn't work. So I removed the colors and corrected that issue to avoid problems in the future.
That's great. A few more things to take care of: 1) Fix the starter button; 2)
Secure the wiring harness to the frame; 3) Put the airbox back on; 4) Put a new muffler on.
Secure the wiring harness to the frame; 3) Put the airbox back on; 4) Put a new muffler on.
The Honda had a MAC header when I bought it. I replaced the header with a stock CB550F headpipe. A MAC replacement muffler is on order. I have the old, rusty MAC muffler on it now, just to keep the noise down. It doesn't fit right so I probably won't ride much until the new one arrives.
I didn't clean the carbs and wonder if the pilots may have gotten clogged during the nine months or so that the bike sat unused.
Next post coming up soon!
Tuesday, June 22, 2010
Let's take the motor apart again
I read some posts on SOHC4.NET from others who had purchased the same piston kit as I. They had problems with excessive oil consumption BIG TIME!

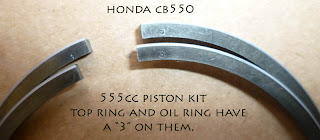 The first picture shows the second piston ring. The mark on it says "STD 3". The second picture shows the top and the oil ring. Click on the photos for larger pics and you can see the marks better. That's the mark indicating "this side up" when installing them on the piston.
The problem stems from installing the oil rings upside down. They push the oil up towards the combustion chamber instead of down towards the crankcase.
I had no idea whether my rings were right side up or not. All I did was install the rings in the correct order. The marks on the rings to indicate "up" or "down" are very small. Old eyes like mine need a magnifying glass to read them.
Further reading indicated that all of the rings have an "up" side. The "up" side of the top piston ring, like the oil ring, can only be identified by the mark. The second ring is kind of easy because it has a ridge along the bottom - intuition says to put the ridge on the bottom.
Here are the rings:

 The first picture shows the second piston ring. The mark on it says "STD 3". The second picture shows the top and the oil ring. Click on the photos for larger pics and you can see the marks better. That's the mark indicating "this side up" when installing them on the piston.
Why a 3? Probably because this is a 3mm overbore kit for CB500 motors. I'm using it on a CB550, making it a 1/2mm overbore.
I spent a Sunday late morning and all afternoon, taking the motor apart down to the pistons, checking the rings, reinstalling and putting the motor back together. Good think I did this now, because about half of the top rings and oil rings were upside down as odds would predict.
I had some problems getting the cam chain on once again. At least this time I figured out how to slacken up the chain tensioner to get that sprocket and chain in place on the cam. Turn the little screw on the tensioner to the left to get the most slack. Don't try forcing the sprocket onto the cam if there's not enough slack, you might end up stripping the threads on the bolt!
So the motor is back together and we're getting close to startup day.
Saturday, June 12, 2010
Changing a tire
The tires on this Honda are old - maybe 10 years, I am not sure. I've owned the bike for nearly three years now and the guy who sold it to me had the Avons on it for at least a few years.
I have a new(er) front rim and tire from a guy who had some extra parts in Mililani. I'll run that tire for awhile.
Picked up a new rear tire from Glenn's Cycle Supply in Kaimuki - a Kenda, with a tube cost about $80 bucks. The tire size is 110/90 x 18. I went with the less expensive tire (Contis etc. run over $100 per tire) because I don't plan on doing much peg scraping, just cruising.
Well I thought I'd give it a shot at changing the tire on my own. The old one was brittle and tough to get off. I had two tire levers and could just barely get the bead over one part of the rim. Bust out the sawzall, cut the tire. I didn't cut down to the bead because I was afraid about messing up the rim with the saw blade. So I levered the bead away from the rim and cut it with a bolt cutter. Both sides.
Removing the tire took awhile, probably 20-30 minutes. Putting on the new one was surprisingly easy. I sprayed soapy water on the rim, used the levers and got one bead on within a minute. Stuck the tube in, put the valve stem in place then sprayed some more soapy water on the remaining bead. It levered pretty easy until the last couple of inches. I stood on the tire to get the bead in and then used one tire lever to get the last section in place. That took all of five minutes - if that. Yeah!
Next I pumped it up and was happy to see I didn't puncture the tube with the tire lever - it was fine.
The tread pattern on the Kenda looks kind of tractor-ish. If I could do it again I might choose another tire even if it cost a bit more. I had ordered a Cheng Shin, but when I went to the shop Glenn told me that size of Cheng Shin went out of production so the distributor sent the Kenda.
That's okay, main thing there's a good tire on the bike with no cracks in the sidewall.
Wednesday, June 9, 2010
Putting the motor back together
Hey it looks like I'll get this motor back together this year! A set of pistons from e-bay should get the bike running nicely again. They are 3mm overbore for a CB500 = .5mm overbore for a CB550. I believe that brings the displacement to 555cc. More importantly, the cylinders will be cleaned up and aligned properly. I read in the FAQ section of SOHC4.net that the cylinders get slightly out of alignment as mileage adds up. Reboring them straightens things out and restores power. I hope that's true!
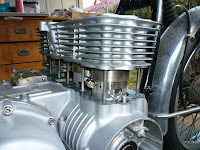
I used a set of hose clamps to compress the rings on cylinders 2 and 3. Once those were in, I moved the hose clamps to cylinders 1 and 4. I did this very slowly to make sure not to break a ring. It would be hard to find replacements.


Another Important Lesson with CB550 Motors
I was pretty excited getting at making progress on the motor. Then I got to the cam installation. On CB550's this is a tough thing to do. Gotta slide the cam in thru the chain, put it in place and then slide the sprocket in "just right". The issue is having enough slack in the cam chain to get the sprocket mounted.
I read about it, followed the procedures described online and I couldn't get it! Kept looking online and then I realized what was wrong: The cam chain was on the wrong side of the front tensioner!
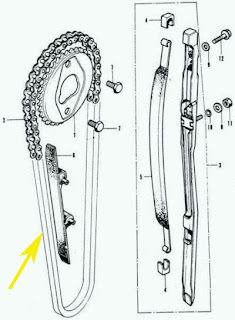
Okay I have taken apart two other inline four motors. My CB400F, 30 years ago and and my Suzuki GS750 back in the mid 1980's. With both of those motors, the cam chain is pushed inwards by the cam chain tensioner at the front of the motor. On the CB500 and CB550, the cam chain goes AROUND the front cam chain tensioner guide. See the diagram below.

Now I had to pull the cylinders off after having so carefully fit the pistons in them! And that's what I did. With the cylinders off I could remove the front tensioner, turn it round and reinstall it with the cam chain in front. With that done, the cylinders went back on (easier the second time), then the head and I was back to installing the cam.
It was still tough to install the chain and sprocket on the cam, using up every little bit of slack in the cam chain and with the tensioner tightened as much as I dared. Eventually I got the chain on the sprocket and the sprocket bolted to the cam.
If you've never done this before, note that the camshaft must be TIMED to the crankshaft. Read the shop manual to learn how to do it. If that's not done correctly, the engine might not run OR the pistons might hit the valves and you're screwed. If you're off just a little, like one tooth from where the cam is supposed to be, the engine will run but it won't be nice.
The motor is pretty much back together now. Last night I worked on the wiring harness, cleaning up connections and crimping some wires. I'll put it back on the bike, then reinstall the carbs and airbox. We're getting there.
Wednesday, May 26, 2010
Important info when working on a CB550 motor
As you can see by the dates in these posts it's taking me a long time to work on my CB550F. Work comes first and this year I've been busy.
Here are some observations.
When I split the cases a couple of months ago I put the transmission parts in a bag. Last week when I started putting the motor back together, the bearing race seen in the photo fell off and out fell some tiny needle bearings! Usually needle bearings are "caged," that is they are held together in a race. This set of bearings has a race but they are not attached. After sitting around for months the oil keeping them in place drained out and the bearings scattered. Most of them were easy to find but I had to hunt around the carport to find the last two on the floor. There are a total of 16 needle bearings. I packed them with automotive grease to keep them together when I put the race back on the transmission main shaft.


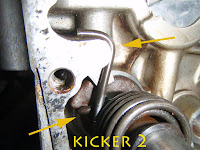
Another item to keep an eye on is the kickstart shaft. It's easy to take motors apart and harder to remember how they go back together. I installed the two transmission shafts and saw that the countershaft was engaging the kickstart shaft. Then I was trying to remember how these two shafts should work together. When I turned the countershaft it would wind up the kickstart shaft. That's okay for starting the engine with the kickstarter but we don't want the two gears to mesh all the time.

Here are some observations.
When I split the cases a couple of months ago I put the transmission parts in a bag. Last week when I started putting the motor back together, the bearing race seen in the photo fell off and out fell some tiny needle bearings! Usually needle bearings are "caged," that is they are held together in a race. This set of bearings has a race but they are not attached. After sitting around for months the oil keeping them in place drained out and the bearings scattered. Most of them were easy to find but I had to hunt around the carport to find the last two on the floor. There are a total of 16 needle bearings. I packed them with automotive grease to keep them together when I put the race back on the transmission main shaft.


Another item to keep an eye on is the kickstart shaft. It's easy to take motors apart and harder to remember how they go back together. I installed the two transmission shafts and saw that the countershaft was engaging the kickstart shaft. Then I was trying to remember how these two shafts should work together. When I turned the countershaft it would wind up the kickstart shaft. That's okay for starting the engine with the kickstarter but we don't want the two gears to mesh all the time.
I was having a hard time figuring this out. So I went to SOHC4.NET and looked for an answer. I did find one post with a video where a guy had a similar problem. Some other forum members made some suggestions, he said "thanks" and did not ever go back to explain if the suggestions worked. I e-mailed the guy and he didn't respond.
Next, I made a new post about the subject. One person gave the wrong answer, another said the kickstart shaft was in the wrong position, still there was not enough detail.
Then I figured it out. Wasn't that hard, just had to sit down, look at the parts and move things around.
Here are the photos:


In the first picture note that the two gears on the kickstart shaft are meshed together. They should be separated when the engine is running and only meshed together when the kickstarter is being used to start the motor.
In the second picture, the arrow is pointing at one end of the kickstart spring, wrapped around a tang on the shaft. The other end of the kickstart spring is hooked to the engine cases.
The problem I had was because one end of the kickstart spring was not properly connected to that tang shown near the arrow. Once I hooked it onto the tang everything was okay. The two gears on the kickstart shaft separated and then they would mesh together when the shaft was pushed down.
Things are moving now. And I have two more motorcycles to work on. I hope to get this Honda back together soon!
Tuesday, December 8, 2009
S&W Shocks for a CB550
I had been trolling E-bay for sometime, looking for a good pair of shocks to replace the stockers. There are several nice sets, available and brand new. I'm not crazy about spending several hundred bucks on a set of shocks.
Awhile ago I got lucky. Instead of looking for CB550 shocks I looked for CB650 shocks. CB650's were around for a few years, never as popular and the CB500 and CB550.
A company had an old pair of S&W's for a CB650, starting bid $15. I emailed the seller and asked for the length eye-to-eye. The seller did not reply. I checked some websites and CB650 shocks were approximately the same length as CB550's - 13 inches.
So I went ahead and bid on the shocks. I had the only bid and won, $15 plus $15 for shipping, $30 total. Okay, they were kind of ugly but they weren't leaking oil.
They cleaned up pretty nicely! I took them apart with my bare hands, no spring compressor required. Repainted the shock bodies black and found a Rustoleum paint - Marigold! - that matches that gold color that was a trademark of S&W shocks back in the 70's and 80's.
Here are the before and after photos:
You'll see them on the bike later. I still have to take the cases apart, paint them and put it all back together.
The holiday season is here. I've now owned the Honda for over two years and ridden it less than 1,000 miles. Once the oil started leaking on the engine it became less fun to ride. When the bike is back together with the oil leak fixed, a rebore and new pistons, new shocks and a rebuilt front brake I think it's going to be a fun ride!
Awhile ago I got lucky. Instead of looking for CB550 shocks I looked for CB650 shocks. CB650's were around for a few years, never as popular and the CB500 and CB550.
A company had an old pair of S&W's for a CB650, starting bid $15. I emailed the seller and asked for the length eye-to-eye. The seller did not reply. I checked some websites and CB650 shocks were approximately the same length as CB550's - 13 inches.
So I went ahead and bid on the shocks. I had the only bid and won, $15 plus $15 for shipping, $30 total. Okay, they were kind of ugly but they weren't leaking oil.
They cleaned up pretty nicely! I took them apart with my bare hands, no spring compressor required. Repainted the shock bodies black and found a Rustoleum paint - Marigold! - that matches that gold color that was a trademark of S&W shocks back in the 70's and 80's.
Here are the before and after photos:

You'll see them on the bike later. I still have to take the cases apart, paint them and put it all back together.
The holiday season is here. I've now owned the Honda for over two years and ridden it less than 1,000 miles. Once the oil started leaking on the engine it became less fun to ride. When the bike is back together with the oil leak fixed, a rebore and new pistons, new shocks and a rebuilt front brake I think it's going to be a fun ride!
Monday, November 23, 2009
Searching for Acorn Nuts

Acorn nuts have those round caps and are (or should I say "were") commonly used as fasteners on twin shock motorcyles. These day there aren't a lot of twin shock motorcycles!
In the photo above you can see one of the old acorn nuts on the left. It was time to replace them. I figured no problem, head to the cycle shop and pick up a pair. I started at South Seas Honda on Nimitz Highway. They checked their parts fiche and came up with nothing. I mentioned to the parts guy, they used these nuts on nearly all Japanese bikes in the 70's and into the 80's. I found it hard to believe they didn't have any acorn nuts in stock. He went and looked in the parts room and came back with an acorn nut for a Yamaha. Cost: $4.99. Okay, that will work. Please make it a set. Oh, he only had one! The Yamaha nut was a different style with a flange. Forget it.
Next I headed toward Waipahu (I was working) and decided to check the Kawasaki shop. Same situation. They only have acorn nuts for Harleys, which are not metric.
I couldn't believe it. No acorn nuts. City Mill carries acorn nuts, however the thread for Hondas is 1.25 pitch, which is not common. Home Depot doesn't carry metric acorn nuts.
Next stop - Ebay. It still took some searching, eventually I found Johnny's Vintage Motorcycle - an Ebay Store. He carried the correct size, 10mm x 1.25 pitch. I ordered three nuts - two replacements and a spare. The cost, with shipping was $7 bucks.
The acorn nuts came in today. As you can see in the photo, the new nuts are a great improvement over the old rusted ones.
Continuing with the rebuild....
Sunday, October 18, 2009
KBS Coatings
I am painting the frame with primer and topcoat made by KBS Coatings. I learned about these products from craigslist ads placed by a guy named Jason who works at Mr. Sandman in Honolulu. KBS coatings stop rust and are very durable. The coatings are flexible, like a thin coat of plastic which should be durable. Jason's number is (808) 636-8995.
I am pretty happy with the KBS coatings results. Take a look at their website and the results look really nice. My first mistake was that I bought the primer and topcoat about six months ago and only this week I got around to using them. Opening the cans for the first time was very difficult. I pried the lids with a screwdriver and then used vice grips to pull the lids all the way off. The topcoat splashed onto the tool bench, the floor and on me. This stuff does not come off easy either.
Okay, with the front half of the frame sanded down I went to work with a brush applying the primer. The following day I put another coat and noticed the coats were not coming out smooth. Get out the sandpaper, smooth it down and apply the topcoat. It looked pretty nice but not super smooth. More sanding and applying topcoat and the results were... good enough! I figure most of the frame will not be visible with the bike back together. So I mainly want the downtubes, tubes on the sides and the swingarm looking good.
Then I noticed the primer and topcoat were getting hard in their cans. I called Jason and asked if I could add thinner to the paint. He said no, come down and get some new paint. He actually gave me a can of the topcoat. He said the primer should have been okay and I should not paint from the can. Yeah it says it on the can but I did it anyways.
So I went and got my free replacement can of topcoat and bought another can of primer for about $15. With the front part of the frame pretty much done, I removed the rear fender, wiring harness etc. and got to work on the back side. I noticed that the fresh can of primer still did not go on super smooth, it was better though. Then I sanded it down and applied the new topcoat. The fresh topcoat went on better than the original can. I think the first can of topcoat had aged and thickened, making it hard to paint the frame nicely and have the topcoat "level" - smooth out.
Tomorrow I'll do a little more finish sanding and put another layer of topcoat on the back of the bike. Next - put the front forks back on, then remove the rear wheel and get to work painting the swingarm.
I tried this paint on some other parts such as the top triple crown. It just doesn't come out smooth enough so I'm sanding it down and then I'll spray paint it with regular paint.
I am pretty happy with the KBS coatings results. Take a look at their website and the results look really nice. My first mistake was that I bought the primer and topcoat about six months ago and only this week I got around to using them. Opening the cans for the first time was very difficult. I pried the lids with a screwdriver and then used vice grips to pull the lids all the way off. The topcoat splashed onto the tool bench, the floor and on me. This stuff does not come off easy either.
Okay, with the front half of the frame sanded down I went to work with a brush applying the primer. The following day I put another coat and noticed the coats were not coming out smooth. Get out the sandpaper, smooth it down and apply the topcoat. It looked pretty nice but not super smooth. More sanding and applying topcoat and the results were... good enough! I figure most of the frame will not be visible with the bike back together. So I mainly want the downtubes, tubes on the sides and the swingarm looking good.
Then I noticed the primer and topcoat were getting hard in their cans. I called Jason and asked if I could add thinner to the paint. He said no, come down and get some new paint. He actually gave me a can of the topcoat. He said the primer should have been okay and I should not paint from the can. Yeah it says it on the can but I did it anyways.
So I went and got my free replacement can of topcoat and bought another can of primer for about $15. With the front part of the frame pretty much done, I removed the rear fender, wiring harness etc. and got to work on the back side. I noticed that the fresh can of primer still did not go on super smooth, it was better though. Then I sanded it down and applied the new topcoat. The fresh topcoat went on better than the original can. I think the first can of topcoat had aged and thickened, making it hard to paint the frame nicely and have the topcoat "level" - smooth out.
Tomorrow I'll do a little more finish sanding and put another layer of topcoat on the back of the bike. Next - put the front forks back on, then remove the rear wheel and get to work painting the swingarm.
I tried this paint on some other parts such as the top triple crown. It just doesn't come out smooth enough so I'm sanding it down and then I'll spray paint it with regular paint.
Sunday, October 4, 2009
The Rebuild Has Begun
It's been close to a year since my last post and I finally found the time to start working on the CB550. The oil leak (probably from O-rings in the head) had worsened to the point where the fins were saturated with lubricant.
The wiring harness has lots of connectors which I carefully unplugged and checked to make sure they all matched up color-wise.
So far I've removed the top end of the motor and painted it with KG (formerly Kal-Kard) silver coating. The coating is darker than stock, I think it looks good though as long as the color is consistent. After the coating dried I noticed there are still thin spots that need another coating or two. I might run out of the coating and do not want to order another bottle from KG (it's expensive!). If it looks like I won't have enough of the KG coating, maybe I'll switch to VHT silver engine paint.
The wiring harness has lots of connectors which I carefully unplugged and checked to make sure they all matched up color-wise.
So far I've removed the top end of the motor and painted it with KG (formerly Kal-Kard) silver coating. The coating is darker than stock, I think it looks good though as long as the color is consistent. After the coating dried I noticed there are still thin spots that need another coating or two. I might run out of the coating and do not want to order another bottle from KG (it's expensive!). If it looks like I won't have enough of the KG coating, maybe I'll switch to VHT silver engine paint.

The valves removed and lapped, then new valve seals were installed by Al at Cycle Tech in Moiliili. While he was at it, Al decarbonized the combustion chambers and valves.
Yesterday I removed the pistons, then removed the rings and cleaned them up. Pistons 1 and 4 were pretty clean. Pistons 2 and 3 had some carbon on the rings as well as in the ring grooves. I scraped the carbon off the rings and used a scotchbrite pad to clean out the ring grooves.
Piston ring gaps were also measured and found within spec. Okay, I admit that I only measured the top rings for each piston.
Next step - removing of the crankcase from the frame!
Subscribe to:
Posts (Atom)